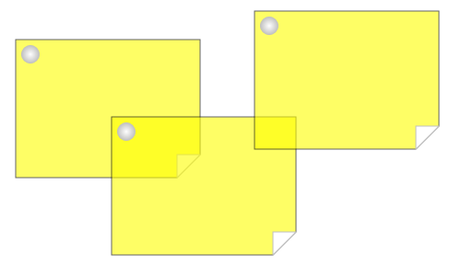
Silverlightで作る付箋紙アプリ その2
まずは付箋紙をぺたぺた貼るためのコンテナになるメイン画面を作る。
この役割は「Page.xaml」に任せるので、「Page.xaml」を以下のように変更する。
Page.xaml
<UserControl x:Class="Fusen.Page"
    xmlns="http://schemas.microsoft.com/client/2007"
    xmlns:x="http://schemas.microsoft.com/winfx/2006/xaml">

    <Canvas x:Name="LayoutRoot" Background="White">
    </Canvas>
</UserControl>
ルート要素をCanvasにして、背景色だけを白に設定しておく。メイン画面はこれだけ。あとは付箋紙コントロールをCanvasの子コントロールとして動的に追加していくことになる。
付箋紙コントロール
付箋紙はUserControlとして作成する。
「Fusen」プロジェクトに「Controls」というフォルダを追加して、その中に「Silverlight User Control」ファイルを新規作成する。ファイル名は「ItemControl.xaml」とする。
とりあえず四角形を描画してみる。
Controls/ItemControl.xaml
<UserControl x:Class="Fusen.Controls.ItemControl"
    xmlns="http://schemas.microsoft.com/client/2007"
    xmlns:x="http://schemas.microsoft.com/winfx/2006/xaml">

    <Grid>
        <Polygon Fill="Yellow" Stroke="Black" Opacity="0.6" Points="0,0 0,150, 200,150, 200,0" />
    </Grid>
</UserControl>

普通に四角形を描画するならBorderとかRectangleとかでもいいけど、今回は右下の角を折り曲げるので自由に形状を作れるPolygonを使っている。
では、右下の角を折り曲げてみよう。
<Polygon Fill="Yellow" Opacity="0.6" Stroke="Black" Points="0,0 0,150, 175,150, 200, 125, 200,0" />
<Polygon Fill="White" Stroke="Silver" Points="175,150, 175,125, 200,125" Cursor="Hand" />

折り曲げた部分をもう一つPolygonを使って描いている。
次は付箋紙をドラッグする時に掴むところを描画する。左上の丸っこい玉ね。
Controls/ItemControl.xaml
<UserControl x:Class="Fusen.Controls.ItemControl"
    xmlns="http://schemas.microsoft.com/client/2007"
    xmlns:x="http://schemas.microsoft.com/winfx/2006/xaml">

    <Grid>
        <Polygon Fill="Yellow" Opacity="0.6" Stroke="Black" Points="0,0 0,150, 175,150, 200,125, 200,0" />
        <Polygon Fill="White" Stroke="Silver" Points="175,150, 175,125, 200,125" Cursor="Hand" />

        <Border BorderBrush="Black" Width="20" Height="20" CornerRadius="10" Cursor="Hand"
            HorizontalAlignment="Left" VerticalAlignment="Top" Margin="6,6,0,0">
            <Border.Background>
                <RadialGradientBrush>
                    <GradientStop Color="White" Offset="0" />
                    <GradientStop Color="Silver" Offset="1" />
                </RadialGradientBrush>
            </Border.Background>
        </Border>
    </Grid>
</UserControl>

う〜ん、素晴らしく簡単!!
ドラッグできるようにする
外観がまだできていないけど、とりあえずドラッグできるようにしておく。
まず、先程追加したBorderにName属性と各マウスイベントを追加する。
<Border x:Name="dragGrip" BorderBrush="Black" Width="20" Height="20" CornerRadius="10" Cursor="Hand"
        HorizontalAlignment="Left" VerticalAlignment="Top" Margin="6,6,0,0"
        MouseLeftButtonDown="dragGrip_MouseLeftButtonDown" MouseLeftButtonUp="dragGrip_MouseLeftButtonUp">
        ...
</Border>
あと、UserControl自体のLoadedイベントにもイベントハンドラを追加しておく(親コンテナのイベントにイベントハンドラを追加するため)。
<UserControl x:Class="Fusen.Controls.ItemControl"
    xmlns="http://schemas.microsoft.com/client/2007"
    xmlns:x="http://schemas.microsoft.com/winfx/2006/xaml"
    Width="200" Height="150"
    Loaded="UserControl_Loaded">
...
</UserControl>
追加したマウスのイベントは、
- マウスの左ボタンが押された時
- マウスの左ボタンが離された時
- マウスが移動した時
- マウスがどっかいった時
これらのイベントを組み合わせてドラッグに対応する。
具体的にどのように対応するかというと、
- dragGrip上でマウスの左ボタンが押される
- dragStartフラグを立てる
- dragStartPosにクリックした位置を記憶しておく
- dragGripの親コンテナ上でマウスが移動される
- dragStartフラグが立っていれば、現在の位置とdragStartPosの位置を比べて、その差分だけ自分自身の位置を移動させる。
- dragStartPosを現在のマウスの位置に入れ替える
- dragGripも親コンテナ上でマウスの左ボタンが離される or dragGripの親コンテナ上からマウスが離れる
- dragStartフラグを下ろす
この処理を実装したのが以下
Controls/ItemControl.xaml.cs
using System;
using System.Windows;
using System.Windows.Input;
using System.Windows.Controls;

namespace Fusen.Controls {
    public partial class ItemControl : UserControl {
        private bool dragStart = false;
        private Point dragStartPos;

        public ItemControl() {
            InitializeComponent();
        }

        private void StopDragging() {
            if(dragStart) {
                dragStart = false;
            }
        }

        private void UserControl_Loaded(object sender, RoutedEventArgs e) {
            if(this.Parent != null) {
                var layoutRoot = (UIElement)this.Parent;

                layoutRoot.MouseMove += dragGrip_MouseMove;
                layoutRoot.MouseLeave += dragGrip_MouseLeave;
            }
        }

        private void dragGrip_MouseLeftButtonDown(object sender, MouseButtonEventArgs e) {
            dragStart = true;
            dragStartPos = e.GetPosition((UIElement)this.Parent);
        }

        private void dragGrip_MouseLeftButtonUp(object sender, MouseButtonEventArgs e) { StopDragging(); }

        private void dragGrip_MouseMove(object sender, MouseEventArgs e) {
            if(dragStart) {
                var curPos = e.GetPosition((UIElement)this.Parent);

                var dragX = curPos.X - dragStartPos.X;
                var dragY = curPos.Y - dragStartPos.Y;

                Canvas.SetLeft(this, Canvas.GetLeft(this) + dragX);
                Canvas.SetTop(this, Canvas.GetTop(this) + dragY);

                dragStartPos = curPos;
            }
        }

        private void dragGrip_MouseLeave(object sender, MouseEventArgs e) { StopDragging(); }
    }
}
では、このコントロールをメイン画面に配置してみる。
「Page.xaml」を以下のように変更する。
Page.xaml
<UserControl x:Class="Fusen.Page"
    xmlns="http://schemas.microsoft.com/client/2007"
    xmlns:x="http://schemas.microsoft.com/winfx/2006/xaml"
    xmlns:My="clr-namespace:Fusen.Controls">

    <Canvas x:Name="LayoutRoot" Background="White">
        <My:ItemControl Canvas.Left="10" Canvas.Top="10" />
    </Canvas>
</UserControl>
サイズ変更できるようにする
次は付箋紙のサイズを変更できるようにする。
まず、サイズ変更用のグリップ(付箋紙の折り曲げてる部分)を描画しているPolygonにName属性と各マウスイベントを追加する。また、付箋紙自体を描画しているPolygonにもName属性を追加しておく。
<Polygon x:Name="resizeArea" Fill="Yellow" Opacity="0.6" Stroke="Black" Points="0,0 0,150, 175,150, 200,125, 200,0" />
<Polygon x:Name="resizeGrip" Fill="White" Stroke="Silver" Points="175,150, 175,125, 200,125" Cursor="Hand"
         MouseLeftButtonDown="resizeGrip_MouseLeftButtonDown" MouseLeftButtonUp="resizeGrip_MouseLeftButtonUp" />
あとは、先程のドラッグの時と同じ理屈で処理を実装する。
Controls/ItemControl.xaml.cs
using System;
using System.Windows;
using System.Windows.Input;
using System.Windows.Media;
using System.Windows.Controls;

namespace Fusen.Controls {
    public partial class ItemControl : UserControl {
        private bool dragStart = false;
        private Point dragStartPos;

        private bool resizeStart = false;
        private Point resizeStartPos;

        public ItemControl() {
            InitializeComponent();
        }

        private void StopDragging() {
            if(dragStart) {
                dragStart = false;
            }
        }
        private void StopResizing() {
            if(resizeStart) {
                resizeStart = false;
            }
        }

        private void UserControl_Loaded(object sender, RoutedEventArgs e) {
            if(this.Parent != null) {
                var layoutRoot = (UIElement)this.Parent;

                layoutRoot.MouseMove += dragGrip_MouseMove;
                layoutRoot.MouseLeave += dragGrip_MouseLeave;
                layoutRoot.MouseMove += resizeGrip_MouseMove;
                layoutRoot.MouseLeave += resizeGrip_MouseLeave;
            }
        }

        private void dragGrip_MouseLeftButtonDown(object sender, MouseButtonEventArgs e) {
            dragStart = true;
            dragStartPos = e.GetPosition((UIElement)this.Parent);
        }

        private void dragGrip_MouseLeftButtonUp(object sender, MouseButtonEventArgs e) { StopDragging(); }

        private void dragGrip_MouseMove(object sender, MouseEventArgs e) {
            if(dragStart) {
                var curPos = e.GetPosition((UIElement)this.Parent);

                var dragX = curPos.X - dragStartPos.X;
                var dragY = curPos.Y - dragStartPos.Y;

                Canvas.SetLeft(this, Canvas.GetLeft(this) + dragX);
                Canvas.SetTop(this, Canvas.GetTop(this) + dragY);

                dragStartPos = curPos;
            }
        }

        private void dragGrip_MouseLeave(object sender, MouseEventArgs e) { StopDragging(); }

        private void resizeGrip_MouseLeftButtonDown(object sender, MouseButtonEventArgs e) {
            resizeStart = true;
            resizeStartPos = e.GetPosition((UIElement)this.Parent);
        }

        private void resizeGrip_MouseLeftButtonUp(object sender, MouseButtonEventArgs e) { StopResizing(); }

        private void resizeGrip_MouseMove(object sender, MouseEventArgs e) {
            if(resizeStart) {
                var curPos = e.GetPosition((UIElement)this.Parent);

                var resizeX = curPos.X - resizeStartPos.X;
                var resizeY = curPos.Y - resizeStartPos.Y;

                resizeArea.Points = new PointCollection() {
                    resizeArea.Points[0],
                    resizeArea.Points[1].Repoint(0, resizeY),
                    resizeArea.Points[2].Repoint(resizeX, resizeY),
                    resizeArea.Points[3].Repoint(resizeX, resizeY),
                    resizeArea.Points[4].Repoint(resizeX, 0)
                };
                    resizeGrip.Points = new PointCollection() {
                    resizeGrip.Points[0].Repoint(resizeX, resizeY),
                    resizeGrip.Points[1].Repoint(resizeX, resizeY),
                    resizeGrip.Points[2].Repoint(resizeX, resizeY)
                };
                this.Width += resizeX; this.Height += resizeY;

                resizeStartPos = curPos;
            }
        }

        private void resizeGrip_MouseLeave(object sender, MouseEventArgs e) { StopResizing(); }
    }

    static class PointExtension {
        /// <summary>
        /// 指定したPoint構造体の位置を変更します。
        /// </summary>
        /// <param name="origin">変更元のPoint</param>
        /// <param name="x">Xの増分</param>
        /// <param name="y">Yの増分</param>
        /// <returns></returns>
        public static Point Repoint(this Point origin, double x, double y) { return new Point(origin.X + x, origin.Y + y); }
    }
}
PolygonのPointsプロパティは各要素を直接変更することができないので、PointCollection自体を作り直す必要がある。それ以外はドラッグの時とほとんど同じ。
Pointの位置を変更するに拡張メソッドを使っているのはご愛嬌。
付箋紙を追加できるようにする
おっと、忘れるところだった。付箋紙をメイン画面に追加できるようにしなくては。
メイン画面に付箋紙を新しく追加するオペレーションはメイン画面の任意の場所をダブルクリックすることなので、まずはメイン画面でダブルクリックされたことを認識する必要がある。
でも、現状のSilverlightではダブルクリックのイベントが拾えないので(正式版では拾えるようになるかは知らない)、自前でやるしかない。ダブルクリックされたかどうかを調べる方法は単純で、マウスの左ボタンが押された時間を覚えておいて、次に押された時間と比較してその間隔がそれっぽかったらいい。
「Page.xaml」のルート要素にマウスの左ボタンが押された時のイベントハンドラを追加する。初めのほうで追加した「My」名前空間やらなんやらは削除しておく。
Page.xaml
<UserControl x:Class="Fusen.Page"
    xmlns="http://schemas.microsoft.com/client/2007"
    xmlns:x="http://schemas.microsoft.com/winfx/2006/xaml">

    <Canvas x:Name="LayoutRoot" Background="White"
            MouseLeftButtonDown="LayoutRoot_MouseLeftButtonDown">
    </Canvas>
</UserControl>
Page.xaml.cs
using System;
using System.Windows;
using System.Windows.Input;
using System.Windows.Controls;

using Fusen.Controls;

namespace Fusen {
    public partial class Page : UserControl {
        private DateTime lastClickTime = DateTime.MinValue;

        public Page() {
            InitializeComponent();
        }

        private void LayoutRoot_MouseLeftButtonDown(object sender, MouseButtonEventArgs e) {
            var now = DateTime.Now;

            if((now - lastClickTime).TotalMilliseconds <= 200) {
                var curPos = e.GetPosition(this);

                var itemCtrl = new ItemControl();
                Canvas.SetLeft(itemCtrl, curPos.X);
                Canvas.SetTop(itemCtrl, curPos.Y);

                LayoutRoot.Children.Add(itemCtrl);
            }
            lastClickTime = now;
        }
    }
}
一般的なダブルクリックの間隔を知らなかったので、感覚的に200ミリ秒にしておいた。
あとはItemControlクラスをインスタンス化して、位置をクリックされた場所に設定してからルート用に追加しているだけ。
これでビルドして実行すると、付箋紙を自由に貼れる事が確認できるばす。

次回はサーバーサイドと連携して、これらの情報の保存と読み出しを行う。

